:: GPG-signing your Git commits
Have you ever wondered what the “verified” button near each commit hash in github/gitlab means? And maybe you want to have the same each time you commit? If you are curious like me and want to have it then here we go ! In this post I will guide you along the way on how to GPG-sign your commits using Git and Github (Not mandatory). Already excited ? Let’s go!
Why do I need to sign my commits any way?
If you are the Developer of an Open Source software (Or not) that deals with people money or at least with critical information then you may need to sign your commits to prove that it was really you who did the changes and not someone else. In that way if someone takes the control of your source code and make commits without them being signed with your GPG key then people will consider them as suspicious commits. In one phrase signing your commits help other people to know that the changes that was made are coming from a trusted source (You or the Organization that is maintaining the code).
GPG Cryptography ?
Heuh… Has someone said cryptography?
GPG stands for GNU Privacy Guard it allows you to encrypt and sign your data and communications. It uses a set of cryptographic algorithms in order to achieve those operations. With GPG utililties we will be intalling below you generate a key pair : Private Key and Public key. The Private key is the one required for signing commits (So it is like your password you need to keep it secret). The Public key is one you could be sharing with everyone.
Don’t panic, you don’t need to master all of those algorithms or concepts in order to have your commits marked with “verified” ![]() . But if you want to know more about to read more about cryptography check this and this.
. But if you want to know more about to read more about cryptography check this and this.
Okay thanks for those links but I want to get my commits signed ![]()
Generating a new GPG key
The operation is relatively straightforward. We will be using Github as the hosting platform for our source codes. Let’s no waste time anymore.
NB : All the commands you’ll see below have been tested on Ubuntu only.
If you don’t yet have any existing GPG key then continue ready, else jump to the step 4.
Github supports the following GPG key algorithms :
- RSA (Rivest Shamir Adleman)
- ElGamal
- DSA (Digital Signature Algorithm)
- ECDH (Eliptic Curve Diffie Hellman)
- ECDSA (Eliptic Curve Digital Signature Algorithm)
- EdDSA (Edwards-curve Digital Signature Algorithm)
If you generate your key with an unsupported algorithm by Github you may get errors (Something I’m sure you don’t want). A way not to have any error is to continue following my steps …
1. We will need first to install the GPG command line tools.
To do so open your favorite terminal (With Ctrl + Alt + T in my case) and run the commands below :
1
2

    sudo apt update
    sudo apt install gpg
And to check if everything is installed you can run the command gpg --version. The minimun required version for this purpose is 2.1.17.
If everything is Ok then let us move to the step 2.
NB: To get the utility from sources or for your platform click here
2. To generate a new key pair paste the text below in your terminal
gpg --full-generate-key or gpg --full-gen-key for short version.
-
You will be prompted to chose the type of key you want. We could be spotting the RSA which is fortunately supported by Github and is even the default algorithm. We will chose it. Press enter and continue;
-
In the next prompt enter
4096, which represents the length in bits of the key; -
At this moment you will be prompted to specify the validity duration of the key. Enter
0if you do not want the key to expire (Let us chose this option);
After the confirmation of the validity duration you will be asked some personnal information that will be linked to the key.
NB: Make sure the email address you will enter is a verified email address on Github.
- After entering and verifying your information you will be asked to enter a passphrase. The passphrase here is the password that will be required to enter before using the private key. It’s a guard for preventing someone else using your keys. Enter a strong one and save it jealously!
You can now take a cup of coffee while waiting the generation of the keys to be ended ![]()
Mine has finished generating. You’ll have a similar output to this one
  gpg: key F9BE7A92520A3D02 marked as ultimately trusted
  gpg: revocation certificate stored as '/home/user/.gnupg/openpgp-revocs.d/1C4ACE74C12E904FBAFA79EDF9BE7A92520A3D02.rev'
  public and secret key created and signed.

  pub   rsa4096 2019-04-01 [SC]
        1C4ACE74C12E904FBAFA79EDF9BE7A92520A3D02
  uid                      john <[email protected]>
  sub   rsa4096 2019-04-01 [E]
That means your keys have been generated successfully ![]()
It’s already taking me too long to have my commits signed I’ll give up
Hey do not give up, there are only few steps left!
3. The command below just displayed us public key (Notice the pub), but private key is required for signing commits or tags. Enter the following command to display the private key of all your available GPG keys : gpg --list-secret-keys --keyid-format LONG. It will now output you something like this one :
sec   rsa4096/F9BE7B91520A3D02 2019-04-01 [SC]
      1C4ACE74C12E904FBAFA79EDF9BE7A92520A3D02
uid                 [ultimate] me <[email protected]>
ssb   rsa4096/3CA2083CEAA89B9E 2019-04-01 [E]
Make sure that before running the command there is no one around you ![]() But even if someone has your private key and don’t know your passphrase it will be impossible for the person to use your keys that is why it is always recommended to have a passphrase set.
But even if someone has your private key and don’t know your passphrase it will be impossible for the person to use your keys that is why it is always recommended to have a passphrase set.
4. From the previous output you need to copy the Key id of the key you want to use. For our example the key id is F9BE7B91520A3D02 and use it with this command
1

  gpg --armor --export F9BE7B91520A3D02
It will print you a large set of random characters starting with -----BEGIN PGP PUBLIC KEY BLOCK----- and ending with -----END PGP PUBLIC KEY BLOCK----- which represents your public key. We will now add it to our github account.
Telling Github about my Generated keys
After have successfully generated the keys we now to inform Github about the generated keys.
1. In the upper-right corner of any page, click your profile photo, then click Settings. As illustrated below

2. In the user settings sidebar, click SSH and GPG keys.

3. Click New GPG key.

4. In the “Key” field, paste the GPG key you copied when you generated your GPG key.
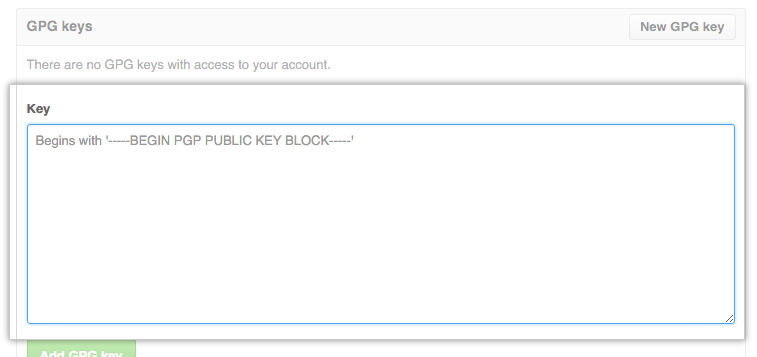
5. Now Click Add GPG key.

Hey dude I don’t use Github what should I do?
If you are using Gitlab the process is quite similar to the one of Github. But if you are using none of them, then you’ll need to read the documentatiion from your favorite host to know how to do so.
Telling GIT about your signing key
At this point we are almost done! There is only one command to run in order to inform Git that we now want to use signing key for each of our commits :
1

git config --global user.signingkey YOUR_KEY_ID_HERE
Run the command we used to list the Key ids before and select the one you want to use then replace the YOUR_KEY_ID_HERE with it. So in our case we will have git config --global user.signingkey F9BE7B91520A3D02
I just did a new commit with git commit -m "Testing" but it didn’t work what’s going on ?
Ha I can realize that you are really hurried ![]()
For the commit being definitely signed, you need to add another option (-S) to the command you typed. So if we sum up we will have :
1

git commit -S -m "Signing commit"
To sign your tags (Releases) there is also an available option to do so :
1
2

git tag -s mytag # Creates a signed tag
git tag -v mytag # Verifies the signed tag
… Visual results in Github
After you commit, you can now push the changes to the upstream server (Github in our case). If you push to Github you will have the Verified badge now being added to all of your commits ![]()
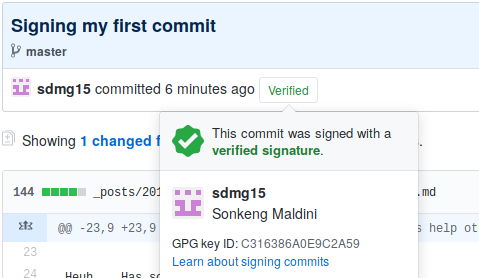
Is that not beautiful? It combines at the same time beauty and security!
Is that what we call black magic? 🤔
Yes somehow ! You can consider cryptography signature as one !
Summary
Arrived at the end, we achieved our goal which was to have our commits signed using GPG (Gnu Privacy Guard) key. Note that even without doing all what we did in Github but doing those in Git you will still have your commits signed and if you give a commit hash to someone with your public key he will be able to proove that you were or were not the one who did the commit. Github is just there to have a beautiful display (With the “verified” badge) of the result.